How much do you really care about a piece of tulle? When it’s going to be your wedding veil, you’d probably care a little more than usual.
As you may recall, I was determined to have an awesome alencon lace veil after trying it on with the dress that got away. Through sheer chance (I’ve had incredible eBay luck) and perseverance, I have, umm, multiple dresses including my coveted alencon lace for much, much less than the original prices. I also was blessed to find tulle and alencon lace locally. I used tutorials from my lovely blogger buddy The Thirty Something Bride and this bride to create the veil. Here is my DIY veil tutorial for someone who barely knows how to sew (part 1 covers laying out the tulle and comb parts).
Materials:
– Tulle of your choice (mine was silk tulle which is the lightest, but priciest)
– Fabric scissors
– Mini binder clips
– head comb of your choice
– needle and white thread
– alencon lace
– narrow satin ribbon (to cover tulle poking out of comb)
– glue
– seam ripper (to fix your mistakes if the lace isn’t aligned well)
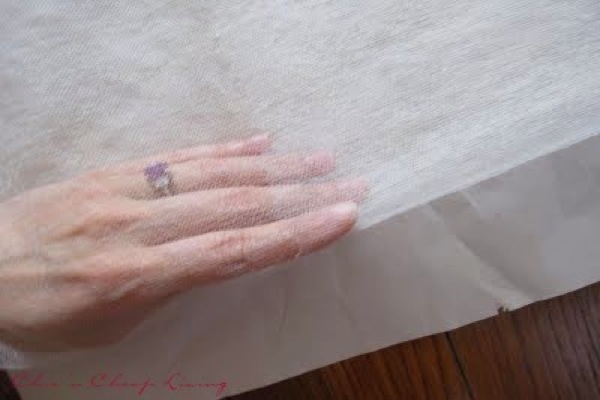
Cutting the tulle
1. Gather your tulle and decide the length and width. The top is now North (N), bottom South(S), left West (W) and right East (E).
2. Then fold it into quarters (first from N to S and then again from W to E). I clipped the tulle together at the edges with mini binder clips.  3. Continually smooth out the tulle so the 4 layers are even when you cut them. You may want to remove and replace the binder clips as you cut through the tulle.
  4. This is to cut out an oval shape (great draping IMO). If you don’t have a pattern, you will want to manually eyeball and cut out a quarter oval (basically a Nike swoosh logo upside down). Cut at a slight angle and round towards the top. Keep in mind that if the top is narrow, the bottom will be as well so don’t cut it too narrowly.
Attach the comb
1. Gather appropriate amount of tulle to gather for your comb. If you use too much it will bunch up on the comb. In my two veil projects, I thought ~6-8″ was a good amount to gather. Adjust as you see fit.
2. Create a substantial knot for the first run. I double knotted thread and knotted the end 6 times.
3. Now make an evenly spaced running stitch (~0.5″). I used pens as guides and sewed over and under them for a few inches. If you have a good eye, simply start sewing! You may need to cut the tulle across a straight line to make it even. Otherwise you get long and short strips to work with.  4. Pull the thread through to gather the tulle.
  5. Tuck pieces of the tulle through the comb evenly. This is important because this will determine the fall of the tulle from the comb.
  6. Sew tulle to the comb (through the teeth) to secure it. 7.You may also sew or glue (as I did) a piece of ribbon to hide the tulle.
  You may need to adjust and gather more tulle to get the “hang” right. Just continually hold the comb with the tulle hanging as if it were hanging from your head and adjust accordingly. Keep reading in Part 2 and see a few modeling shots too!


[…] saved search so you receive e-mails whenever an item is listed that matches your search. Remember my veil? Yep, I got the silk tulle for $50 from eBay (it’s usually more than twice that amount in any […]